Recording audio and video in a PowerPoint presentation can improve the overall effectiveness and impact of your presentation because it can make it more interesting and keep your audience engaged.
Microsoft PowerPoint 2013 and later versions allow you to record your presentation with audio and video, so you can enhance your slides with voice narration or by recording yourself during the narration via the camera.
In this guide we show, how you can record your voice or yourself while presenting a Microsoft PowerPoint Presentation and how to insert an audio or video file to a Presentation. You will also learn how to save the presentation as a video file or as a PowerPoint Show after you have finished recording audio/video.
There are two ways to include audio and video in your PowerPoint presentation: record a slide show with audio from your microphone and video from your camera, or add external audio and video to your presentation from a file.
* Note: As mentioned above, to add sound and video to a PowerPoint presentation you should have Microsoft PowerPoint 2013, 2016, 2019 or PowerPoint for Office 365.
To record your voice narration and/or yourself while presenting the slides in a presentation:
Before recording your audio/video to a PowerPoint presentation, make sure that your microphone and camera settings are properly configured.
To adjust your microphone and camera settings for optimal quality:
1. Press Windows + I keys to open Windows Settings.
2. Go to System > Sound and under Input Settings select your microphone device and make sure the input volume is set to at least 80%
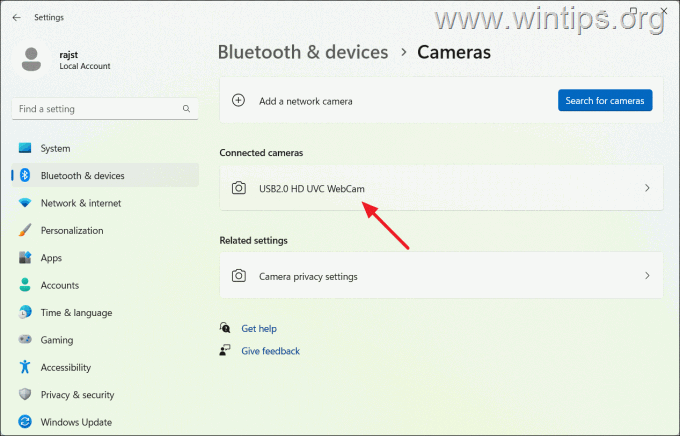
3. When done, go to Bluetooth & devices > Cameras > Connected Cameras and ensure that your camera is recognized by the system.
Before you start recording audio/video in a presentation, it's important to know that audio cannot be recorded during animations and slide transitions. So, to avoid interruptions of your speech during the presentation, remember to leave a brief pause of 1-2 seconds in your narration at the beginning and end of each slide.
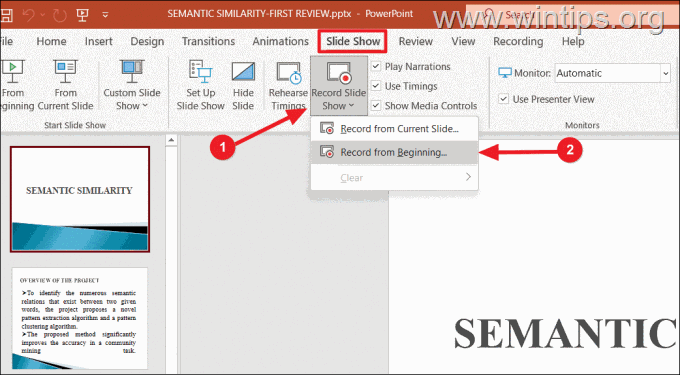
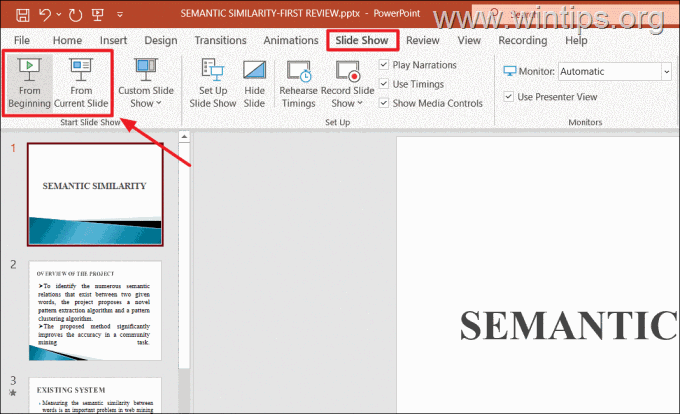
1. Open the PowerPoint presentation in which you want to record audio and video.
2. From the Slide Show tab (or the Recording tab), click the Record Slide Show button and choose either Record from Current slide or Record from Beginning, depending on which point you want to add audio/video.
3. The presentation will open in a recording window in full-screen mode.

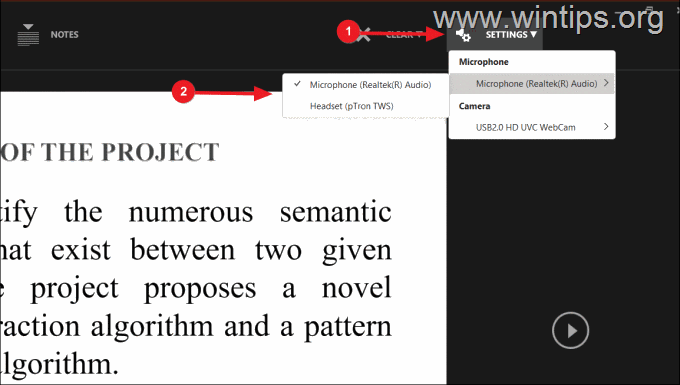
4. Click the SETTINGS button at the top-right corner and ensure the correct microphone and camera devices are selected.
5. Use the Microsoft and Camera icons in the bottom right corner of the screen to turn off the input of the Microphone or Camera device if it is not needed during the presentation.

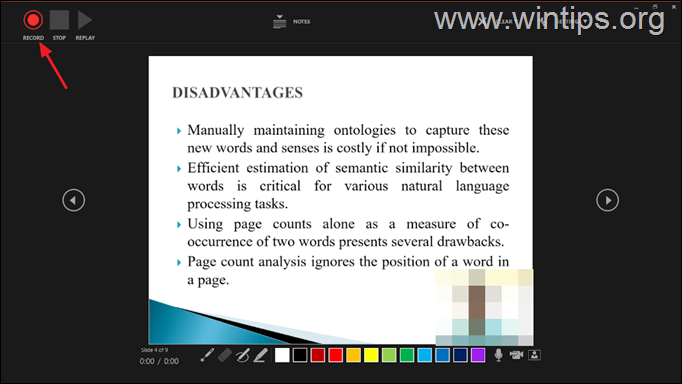
6. When you are ready, click the RECORD button to start recording your voice and/or camera input and present your slides.
7. Use the arrow keys to navigate through slides (forward only). Remember that you cannot go back or forward to a slide that already has a recording. This is to prevent accidentally recording over an existing recording.
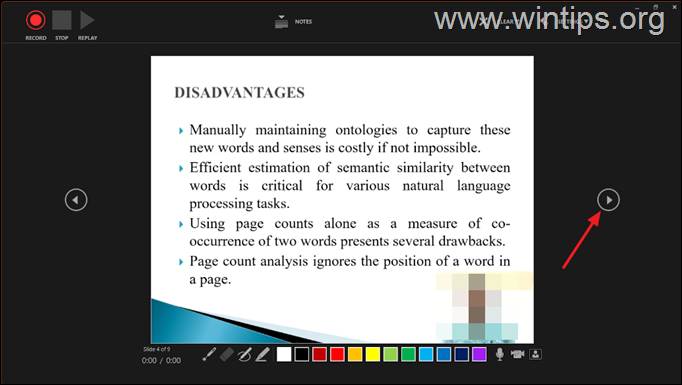
8. If there are videos in your slides, click on them to start or stop the playback.

9. Use the Pen, Highlighter, or Laser icons from the bottom right corner to annotate your slides.
![clip_image026[3]](https://www.wintips.org/wp-content/uploads/2023/06/clip_image0263_thumb.png)
10. Look at the bottom left corner to find out the time counts for the current slide and the entire presentation.
![clip_image028[3]](https://www.wintips.org/wp-content/uploads/2023/06/clip_image0283_thumb.png)
11. If a slide already contains a recording, you will see a video preview or a speaker icon displayed at the bottom right corner.
![clip_image030[3]](https://www.wintips.org/wp-content/uploads/2023/06/clip_image0303_thumb.png)
12. To pause or stop recording using the Pause and Stop buttons.
![clip_image032[3]](https://www.wintips.org/wp-content/uploads/2023/06/clip_image0323_thumb.png)
13. When finished Close the recording window (or right-click and select End Show).
![clip_image034[3]](https://www.wintips.org/wp-content/uploads/2023/06/clip_image0343_thumb.png)
After completing the recording, it is crucial to review the recordings of each slide before exporting the file as a PowerPoint show or video. To preview your recordings in your PowerPoint presentation:
1. Go to the Slide Show tab and click either From Beginning or From Current Slide to start playback.
2. Make sure each slide has a record and timing by changing the View to Slide Sorter.
![clip_image038[3]](https://www.wintips.org/wp-content/uploads/2023/06/clip_image0383_thumb.png)
3. On each slide where audio has been recorded you will see an audio icon along with the time/duration of the recording.

4. When you are satisfied with your recordings, you can move on to the next steps and export the entire presentation, including your audio and videos, either as a PowerPoint Show as a video file.
If you want to export your Presentation as a PowerPoint Show (.ppsx), which is useful if you want your presentation to be viewed even on computers that don't have the Microsoft PowerPoint app installed, do the following:
1. Click on File and select Save As.
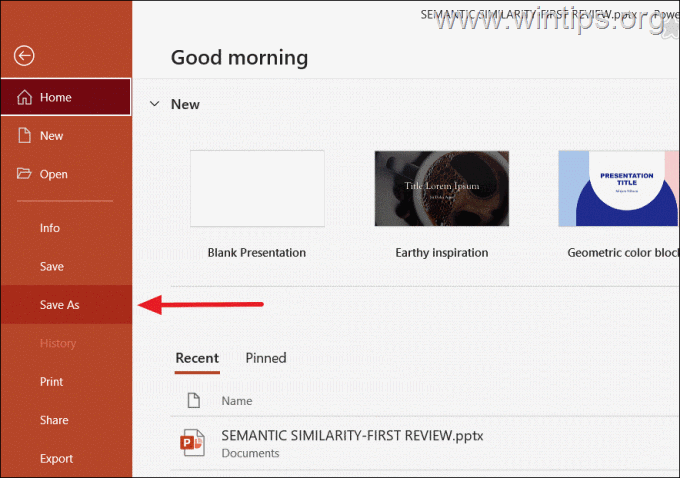
2. Choose the location where you want to save the file and select PowerPoint Show (*.ppsx) format from the Save as type drop-down menu.
![clip_image044[3]](https://www.wintips.org/wp-content/uploads/2023/06/clip_image0443_thumb.png)
3. Then, click Save to save the file as a PowerPoint Show.
![clip_image046[3]](https://www.wintips.org/wp-content/uploads/2023/06/clip_image0463_thumb.png)
If you prefer to export your PowerPoint SlideShow as a video file, follow these steps:
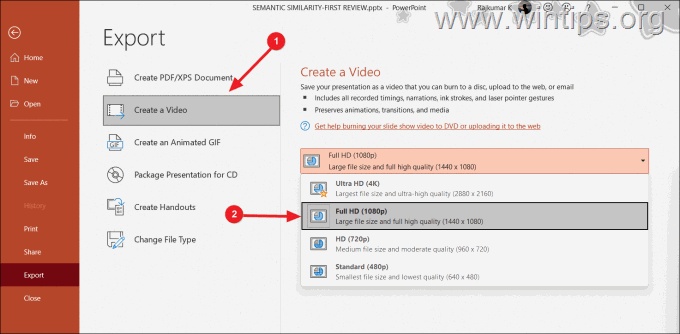
1. Click on File and select Export.

2. Then Click the Create a Video option and select the preferred video quality from the first drop-down menu (e.g., Full HD 1080p).
3. Then select the Use Recorded Timings and Narrations option in the next drop-down menu.
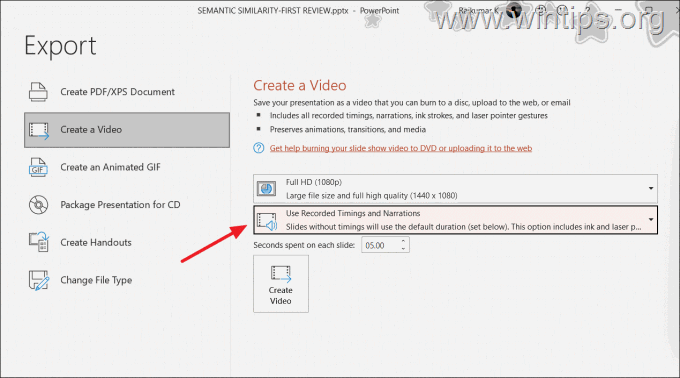
4. Then adjust the Seconds spent on each slide for the slides without recordings.
![clip_image054[3]](https://www.wintips.org/wp-content/uploads/2023/06/clip_image0543_thumb.png)
5. Finally, click the Create Video button and select the location to save the video.
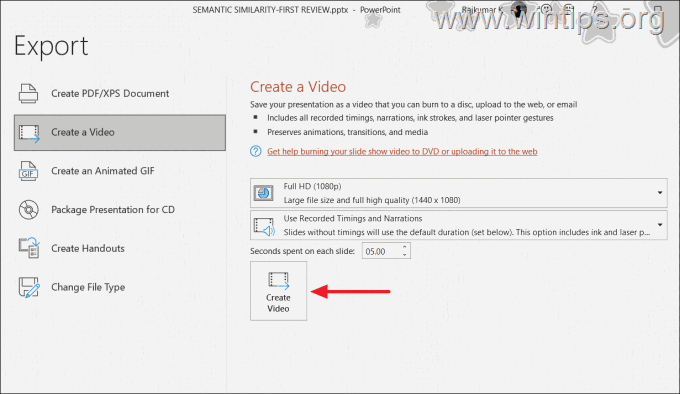
6. Now wait for the PowerPoint to finish creating the video, as it may take some time depending on the performance of your computer.
7. Once the video is created, you can play it using any video player of your choice.
Instead of directly capturing audio and video within PowerPoint, you can insert an external audio or video file in your presentation.
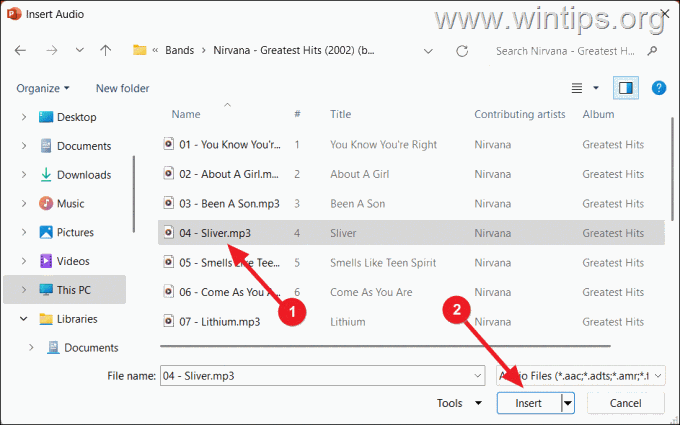
To insert an audio file from your computer (such as pre-recorded narration, background music), to a slide:
1. Open your PowerPoint presentation and navigate to the specific slide where you want to add the audio.
2. Then, go to the Recording tab, click on the Audio button, and select the Audio on My PC option.
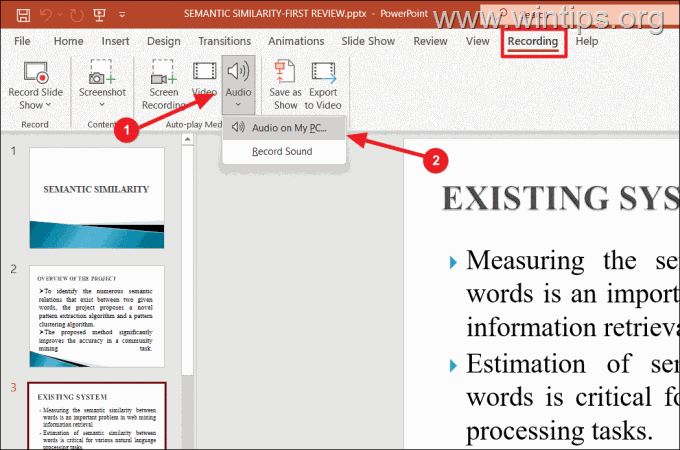
3. Then, choose the desired audio file from your device and click Insert.
4. The added audio file will appear as a small speaker icon in your presentation.
![clip_image062[3]](https://www.wintips.org/wp-content/uploads/2023/06/clip_image0623_thumb.png)
5. When you click on the speaker icon, the Playback tab will appear in the Ribbon. Move to the Playback tab and click the Play in Background option if you want the audio to play across all slides.
![clip_image064[3]](https://www.wintips.org/wp-content/uploads/2023/06/clip_image0643_thumb.png)
If you want to insert a video file from your PC, inside a Presentation.
1. Open the presentation and navigate to the specific slide where you want to add the audio.
2. Switch to the Recording tab and click on the Video button.
![clip_image066[3]](https://www.wintips.org/wp-content/uploads/2023/06/clip_image0663_thumb.png)
3. Then, select the video file that you want to add in the slide and click Insert.
![clip_image068[3]](https://www.wintips.org/wp-content/uploads/2023/06/clip_image0683_thumb.png)
4. Resize the video window as needed, and then customize the Playback settings from the Playback tab.
![clip_image070[3]](https://www.wintips.org/wp-content/uploads/2023/06/clip_image0703_thumb.png)
Once the audio and video files are inserted, you can export the presentation to a video file or save it as a PowerPoint show. To do that:
1. Select the Recording tab:
![clip_image072[3]](https://www.wintips.org/wp-content/uploads/2023/06/clip_image0723_thumb.png)
That's it! Let me know if this guide has helped you by leaving your comment about your experience. Please like and share this guide to help others.
If this article was useful for you, please consider supporting us by making a donation. Even $1 can a make a huge difference for us in our effort to continue to help others while keeping this site free:
We're looking for part-time or full-time technical writers to join our team! It's about a remote position that qualified tech writers from anywhere in the world can apply. Click here for more details.
Konstantinos is the founder and administrator of Wintips.org. Since 1995 he works and provides IT support as a computer and network expert to individuals and large companies. He is specialized in solving problems related to Windows or other Microsoft products (Windows Server, Office, Microsoft 365, etc.).
Latest posts by Konstantinos Tsoukalas (see all)Konstantinos is the founder and administrator of Wintips.org. Since 1995 he works and provides IT support as a computer and network expert to individuals and large companies. He is specialized in solving problems related to Windows or other Microsoft products (Windows Server, Office, Microsoft 365, etc.).